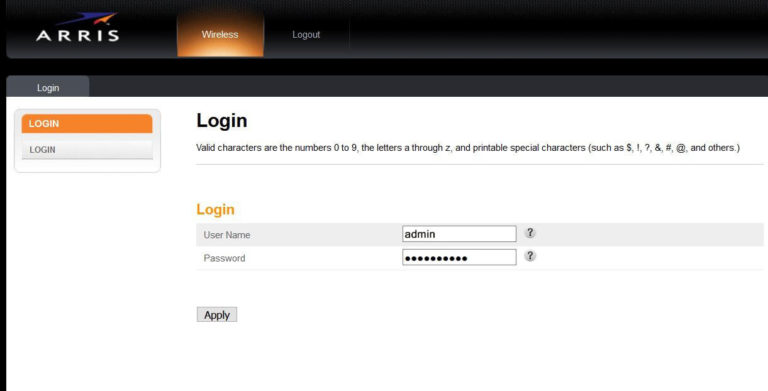
Arris Router Login interface can be accessed by using 192.168.0.1 or by clicking on http://192.168.0.1. This admin interface lets you do the following things with ease –
- You can set different network types. This includes creating guest networks.
- You get to select the WiFi connection type – 2.4Ghz or 5Ghz.
- WiFi passwords and SSID can also be changed.
- QoS packet scheduler can be applied.
- The router’s firmware can be updated.
- A firewall can be installed over the network.
- Routers and modems can be factory data reset.
In order to confirm the IP address, this is what needs to be done –
Windows
- Go to Start > Go to Run > Type cmd > Press Enter.
- Type ipconfig > List down the network connection types.
- Note down the Default Gateway for Arris Router.
- This should be 192.168.0.1
Mac OS X
- Open the Terminal Application.
- Type /sbin/ifconfig > List down the IP addresses.
- Note down the required IP address.
How to login to Arris Router and Steps to Change its Login Password?

Here are the two requirements to access the router’s admin page –
- The router should be connected to the internet connection.
- The router should be connected to a computer/smartphone/tablet by a wired/wireless connection.
Once the aforementioned points are confirmed, here is what needs to be done –
-
- Go to any web browser (Chrome, Firefox, Safari).
- Go to the address bar > Type the IP Address: 192.168.0.1 or click on http://192.168.0.1 > Press Enter.
- Login using the default credentials –
- Username: admin or cusadmin
- Password: password
- Click on Login and you will be logged in.
- Go to Maintenance and Management > Select the user: admin from the dropdown list.
- Scroll down and set the password (password can be alphanumeric with special characters including space).
- Click on the Apply button > The router will restart.
- Done.
Please note that these login credentials can also be found at the backside of the router.
How to change the Arris WiFi Network Name/SSID?

The Arris router will have a default SSID set for the network (wired and wireless). Here is what needs to be done in order to get it changed –
- Open a web browser > Go to the address bar and type 192.168.0.1 or type http://192.168.0.1 > Press Enter.
- Login to the admin panel by entering the router’s admin credentials.
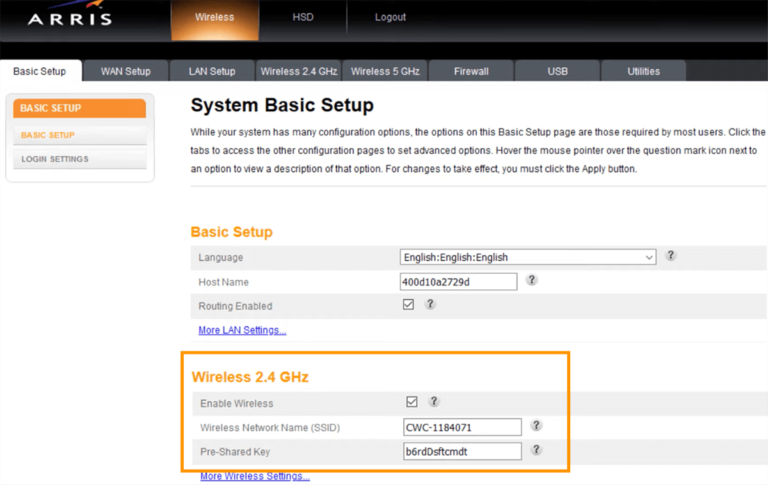
- Go to System Basic Setup.
- Search for Wireless Network Settings.
- Select your wireless network type (2.4Ghz or 5Ghz wireless).
- Look for the Wireless Network Name (SSID) option for the connection type and set its value.
- Click on Apply for the settings to be saved.
- The router will reboot initially.
- Done.
Once you are done changing the SSID, here is how you can change the WiFi password –
- Go to any web browser > Go to the address bar > Type 192.168.0.1 or http://192.168.0.1 to open the router’s admin control panel login page.
- Login using the default/new admin credentials > Press Enter.
- Go to System Basic Setup.
- Go to the Wireless Network Settings.
- Select the network type – 2.4Ghz WiFi or 5Ghz WiFi.
- Choose the password encryption type – WPA2-PSK.
- Set the new password under the pre-shared key.
- Click on Apply in order to save the settings.
- Wait for the router to reboot > It can take up to a minute to restart.
- Done.
How to factory reset the router?
Here is how you can factory reset the router to an original state –
- Open a web browser > Type 192.68.0.1 > Press Enter.
- Enter the login credentials and login to the admin control panel.
- Go to Router Maintenance and Management > Look for Reset.
- Click on Reset > Press Yes when it asks you to grant permission.
- Done.
Please note that resetting the router will reset every setting that has been applied to it. This includes – custom DNS, QoS, WiFi settings like SSIDs/passwords, and router login credentials.
